
An easy step by step guide for making a simple soap carving knife.
With only three craft sticks (popsicle type) young folks can learn how to care for carving and whittling pocket knives in a relatively safe way and have fun while doing so.
After completion, the "Soap Carver"can be used to make carvings out of bars of soap, cakes of plaster (made from a mixture of equal parts plaster of paris and vermiculite molded in small milk cartons,etc.) or modeling clay.
Important: The following project should be done with adult
supervision as sharp tools will be used to make your "SOAP CARVER"!
Materials for "Soap Carver"
|
Recipe for Carving Plaster - What you need:
|
How to make the "Soap Carver":
Step #1:
Mark one stick as shown in figure #1 and carefully cut off the corner

Step #2:
Next, Carefully trim or sand a tapered edge of both sides of the blade that you cut in
step #1…

Step #3:
Mark two sticks a little over half way of their lengths and cut them in two as in
figure #3.

Step #4:
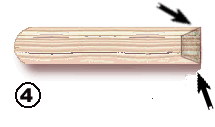
Looking at figure #4, cut a bevel edge on the cut end of each of the two sticks from step
#3. Only do this on ONE side of each stick.

Step #5:
Next, glue the handle's sides (the two sticks from step #4) onto the longer third
stick as shown in drawing #5. Set aside to completely dry.

Step #6: Once the carver has had time to dry, you may now "sharpen" your carver blade, as shown by the dotted lines in drawing #2. Use the medium grit sandpaper as a sharpening stone and be sure to follow proper sharpening techniques and safety rules.
Step #6: You can paint, stain or decorate your carver' and even drill a hole in the grip end for a loop of lanyard or leather as a strap. Make a holder for your carver from any sturdy material such as scrap leather, cardboard, etc. Keep your carver in it's holder, called a sheath, when you are not using it.
REMEMBER: ALWAYS follow safety rules in handling any cutting tool. It
is not a toy!
Your SOAP CARVER can be used to carve soap bars, bars of plaster, modeling clay and ... fingers if not careful!
D.E. Cantrell ©1997 - All rights
reserved - Permission for use , unmodified and in whole, by scouts, schools and
other youth organizations for non-profit purposes is granted.